IPFS - Network
IPFS 디자인 - Network
IPFS는 다양한 기능을 담당하는 하위 프로토콜을 조합하여 구성된다.
- Identities
- Network
- Routing
- Exchange
- Discovery
- Objects
- Files
- Naming
IPFS 를 구성하는 많은 모듈들은 별도의 프로젝트로 진행되고 있다.
- IPFS - Content Addressed, Versioned, P2P File System (DRAFT 3)
- github.com/ipfs/specs
- github.com/libp2p/specs
- github.com/ipld/specs
차분히 하나씩 알아보는 시간을 가지고자 한다.
1. Network
IPFS의 Network 기능은 독립 프로젝트인 libp2p 를 사용하고 있다.
1.1 libp2p
P2P Network 를 구축하는데 발생하는 다양한 문제를 해결하는 것을 목적으로 한 라이브러리 모음이다. github.com/libp2p/specs
IPFS 는 장착된 모듈을 활용하여 내부에서 이용하는 P2P Network 를 구축한다.
공식 구현은 다음과 같다.
1.2 Transport agnostic
3.1 Transport agnostic - github.com/libp2p/specs
P2P 시스템은 Internet 위에 Overlay Network 를 구축한다.
libp2p 는 TCP(UDP)/IP에는 의존하지 않고 Ethernet, Bluetooth 등 다양한 Transport Protocol 에도 마찬가지로 P2P 시스템을 구축하는 것을 목표로 하고있다.
1.2.1 multiaddr (self-describing addressing)
자기 기술형 애드레싱 (Adressing) 이라고 할 수 있다. Address 를 표현하는 문자열에 자신이 이용하고 있는 Protocol 을 포함하는 형식으로 multihash 와 같은 방식을 사용한다.
libp2p 에서는 multiaddr 방식이라고 설명하고 있다.
/<protoName string>/<value string> + <protoName string>/<value string> + ...
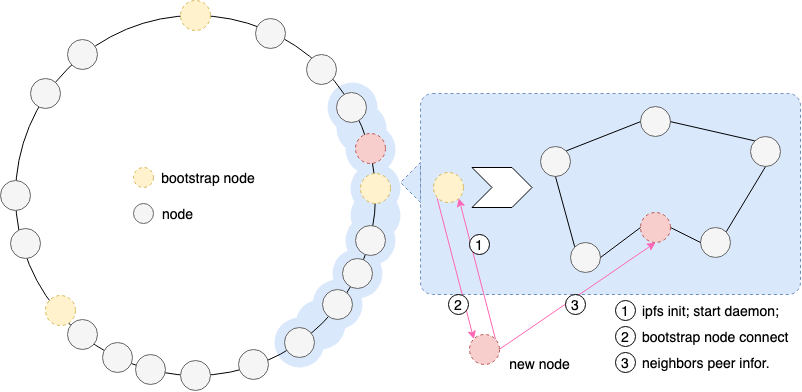
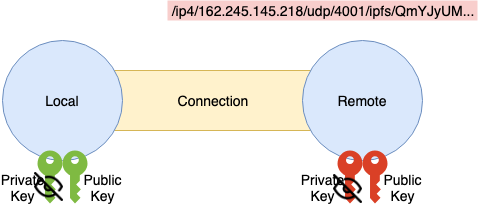
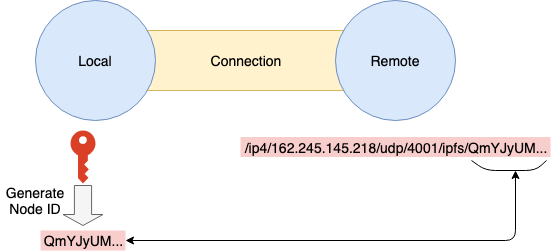
IPFS 의 Node Address 의 경우 다음과 같이 <multiaddr>+/ipfs/<Node ID> 포맷으로 나타낸다.
/ip4/127.0.0.1/tcp/9000/ipfs/QmYJyUMAcXEw1b5bFfbBbzYu5wyyjLMRHXGUkCXpag74Fu
# Address :
#   IP          : 127.0.0.1
#   tcp         : 9000
#   IPFS NodeID : QmYJyUMAcXEw1b5bFfbBbzYu5wyyjLMRHXGUkCXpag74Fu
multihash 의 특징으로서 ~ over ~ 를 다층적으로 표현할 수 있다.
# IPFS over TCP over IPv6 (typical TCP)
/ip6/fe80::8823:6dff:fee7:f172/tcp/4001/ipfs/QmYJyUMAcXEw1b5bFfbBbzYu5wyyjLMRHXGUkCXpag74Fu

# IPFS over uTP over UDP over IPv4 (UDP-shimmed transport)
/ip4/162.246.145.218/udp/4001/utp/ipfs/QmYJyUMAcXEw1b5bFfbBbzYu5wyyjLMRHXGUkCXpag74Fu

# IPFS over IPv6 (unreliable)
/ip6/fe80::8823:6dff:fee7:f172/ipfs/QmYJyUMAcXEw1b5bFfbBbzYu5wyyjLMRHXGUkCXpag74Fu

# IPFS over TCP over DNS4
/dns4/example.com/tcp/4001/ipfs/QmYJyUMAcXEw1b5bFfbBbzYu5wyyjLMRHXGUkCXpag74Fu

# IPFS over TCP over IPv4 over TCP over IPv4 (proxy)
/ip4/162.246.145.218/tcp/7650/ip4/192.168.0.1/tcp/4001/ipfs/QmYJyUMAcXEw1b5bFfbBbzYu5wyyjLMRHXGUkCXpag74Fu

# IPFS over Ethernet (no IP)
/ether/ac:fd:ec:0b:7c:fe/ipfs/QmYJyUMAcXEw1b5bFfbBbzYu5wyyjLMRHXGUkCXpag74Fu
Layer 마다 Protocol 또는 프록시 구성이 명시적으로 표현되어 있는 것을 알 수 있다.
모든 네트워킹 프로토콜이 libp2p 에 의해 구현된 것은 아니다.
multiaddr 자체는 문자열이지만 사용하기 쉽게 하기 위해서는 Parser/Validator 가 필요하다.
Node.js 의 경우 js-multiaddr 를 이용해 Parse 한다. Validation는 js-mafmt 가 담당한다.
Go의 경우 go-multiaddr 를 이용해 Parse 한다. 그 외 multiaddr Instance 를 조작하여 캡슐화/해제 및 터널링을 표현하는 새로운 Instance 를 생성하는 등 편리기능도 가진다.
1.3 Multi-multiplexing
3.2 Multi-multiplexing - github.com/libp2p/specs
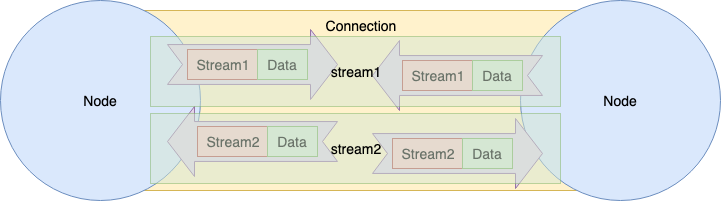
libp2p 는 Multi-multiplexing (다중-멀티플랙싱) 개념이 있다. IPFS 에서 이야기 하는 다중-멀티플렉싱의 개념을 설명하는 자료는 링크외에 찾지 못하여 정확한 분석이 어렵다. 대략적인 느낌은 “다양한 유즈케이스에서 사용하는 여러 네트워킹 중 가능한 작은 수 (적합한 네트워크) 를 선택할 수 있도록 유연한 설정을 제공” 한다는 것으로 아래와 같다:
- 여러 listen 네트워크 인터페이스를 다중화
- 여러 전송 (Transport) 프로토콜을 다중화
- Peer 당 여러 연결 (Connection) 을 다중화
- 여러 클라이언트 프로토콜을 다중화
- 연결 당, 프로토콜 당 여러 스트림을 다중화 (SPDY, HTTP2, QUIC, SSH)
- flow control (backpressure, fairness)
- 서로 다른 임시 키로 각 연결을 암호화
예를 들어, 다음과 같은 단일 IPFS 노드를 상상:
- 특정 TCP/IP 주소에서 listen
- 서로 다른 TCP/IP 주소에서 listen
- SCTP/UDP/IP 주소를 listen
- UDT/UDP/IP 주소를 listen
- 다른 노드 X 에 대한 여러 (multiple) 연결
- 다른 노드 Y 에 대한 여러 연결
- 연결 당 여러 스트림이 open
- HTTP2 를 통해 스트림을 노드 X 에 다중화 (multiplexes)
- SSH 를 통해 스트림을 노드 Y 에 다중화
libp2p의 맨 위에 마운트 된 하나의 프로토콜은 하나의 피어 당 하나의 스트림을 사용libp2p의 맨 위에 마운트 된 하나의 프로토콜은 피어 당 여러 (multiple) 스트림 사용
이 정도의 유연성을 제공하지 않으면 다양한 플랫폼, 유즈케이스 또는 네트워크 설정에서 libp2p 를 사용할 수 없다. 필요로하는 것을 정확하게 사용할 수 있도록 충분히 유연하다. 사용자 또는 응용 프로그램 제약 조건의 복잡함이 옵션으로 libp2p 를 배제하지 않도록 할 수 있다.
1.3.1 Transports
Peer 간 접속을 확립할 때 Transports 라는 인터페이스 사양으로 정의되어 있다.
TCP, UDP, WebRTC, WebSocket 등의 다양한 Transport Protocol 을 사용 가능하게 하는 것을 목적으로 하고 있다.
- Client
- Dial (Client ) 기능
multiaddr에 의한 접속처 Peer 지정이 가능- 돌려받는 Connection 은 interface-connection 을 제공하여야 함
- Server
- Listen (Server) 기능
- Handler 에 Connection 은, interface-connection 을 제공하여야 함
- 인스턴스화
- 예를 들어 WebRTC 의 Signaling 정보는 Dial/Listen 에서 공통적으로 이용하므로 인스턴스화하여 상태를 보관
1.3.2 Connection
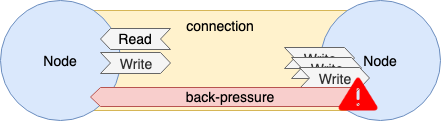
Transporter 에 의해 작성된 Connection 의 action 은 Connection 인터페이스 사양으로 정의되어 있다.
- Read/Write
- Full/Half Duplex 서포트
- 플로우 제어
- Back-Pressure
- 절단 처리
- Half-Close
Transports 와 Connection 을 구성한 라이브러리는 아래에 정리되어 있다.
Transports - libp2p.io/implementations
- libp2p-tcp
- libp2p-quic (Stream Muxer 포함)
- libp2p-websockets
- libp2p-webrtc-star
- libp2p-webrtc-direct
- libp2p-udp
- libp2p-utp
Go
Go 의 libp2p Interface 는 go-libp2p-net 프로젝트에서 정의하고 있다.
Transport 에 관한 interface 는 go-libp2p-transport 모듈에 정의하고 있다. (예를 들어 접속을 나타내는 Conn 은 libp2p-net/Conn 을 확장)
즉, 각 Transport 구현은 go-libp2p-transport 의 Interface 를 구현하는 형태가 된다.
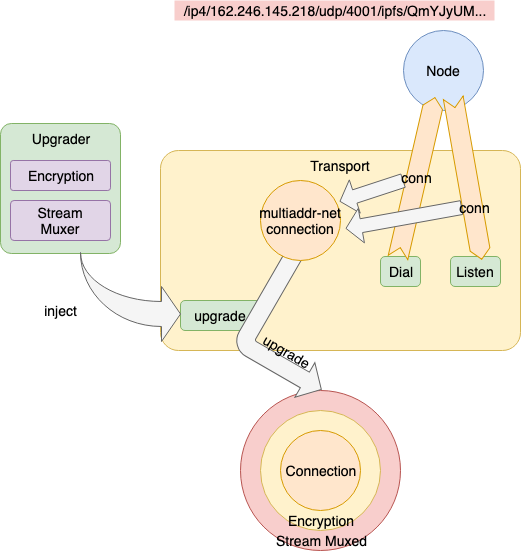
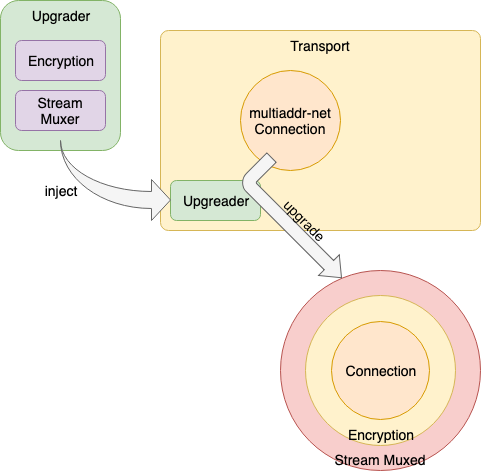
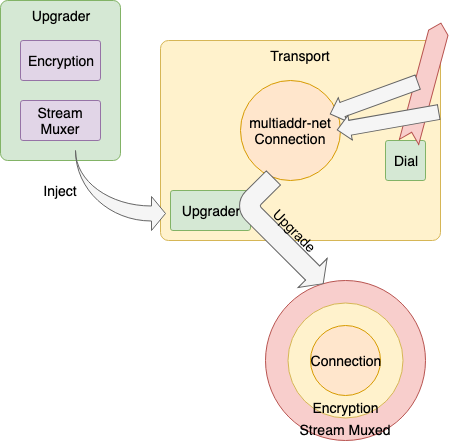
다른 Node 에 접속요구 또는 다른 Node 로부터 접속 요구를 수신해 확립된 접속 (ex. net.Conn, websocket.Conn) 은 ① go-multiaddr-net 의해 multiaddr friendly 한 API로 랩핑 된 후, ② go-libp2p-transport-upgrader 의해 Stream 다중화 가능 통신의 암호화 된 Connection으로 Upgrade (후술)된다.
1.3.2.1 Connection Manager
네트워크 자원을 관리하기 위해서는 전체 Connection 을 종합적으로 감시하는 역할이 필요하다.
이를 위한 역할이 Connection Manager 이다.
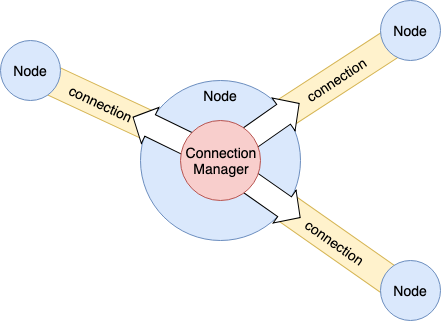
- 접속 Node 수 제한
- 대역 제한
- 수신/송신별 제한
- Latency 감시
구현
- Node
- Go
- go-libp2p-interface-connmgr (Interface only)
1.3.2.2 Filter
접속하고 싶지 않은 Node 가 있는 경우 Filter 를 설정할 수 있다.
Filter 대상은 multiaddr 에 의해 지정된다.
// make a new filterset
f := NewFilters()

// filter out addresses on the 192.168 subnet
_, ipnet, _ := net.ParseCIDR("192.168.0.0/16")
f.AddDialFilter(ipnet)

// check if an address is blocked
lanaddr, _ := ma.NewMultiaddr("/ip4/192.168.0.17/tcp/4050")
f.AddrBlocked(lanaddr) // = false
구현
- Node
- Transport Class 는 공통으로
filter메소드를 제공
- Transport Class 는 공통으로
- Go
- go-maddr-filter
- multiaddr-filter: CIDR 형식의 넷 마스크를 multiaddr 로 작성
ipnet, _ := multiaddrFilter.NewMask("/ip4/192.168.0.0/ipcidr/16")
1.3.3 Network Layer
libp2p 에서 Network Protocol 의 구성은 역할별로 몇가지 Layer 로 나뉘어 있다.
TCP/IP 계층 모델의 경우 (OSI 모델에 대략 대응하는 것),
- Link (물리층, 데이터링크)
- Internet (네트워크)
- Transport
- Application (세션, 프레젠테이션, 어플리케이션)
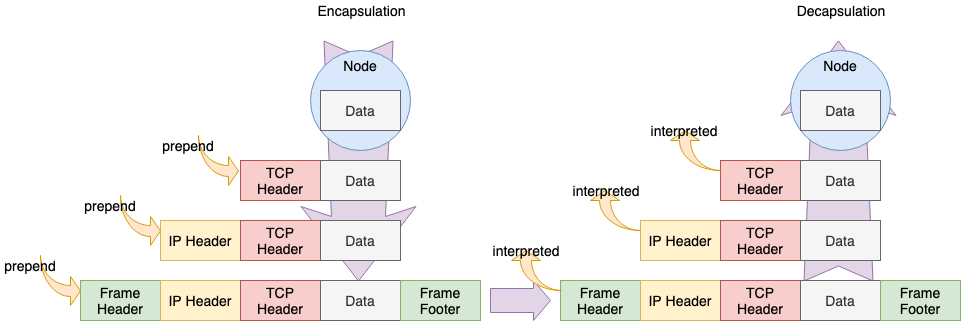
라고 하는 Layer 를 형성하고 있다. 송신 데이터그램은 Upper 에서 시작되어 Lower 를 향해서 Encapsulation 되며 수신은 Lower 에서 시작되어 Upper 를 향해서 Decapsulation 가 된다.
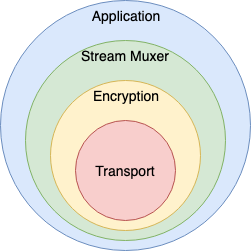
libp2p 에서는 대략 다음과 같은 Layer 가 형성되고 있다.
- Transport Layer
- Encryption Layer
- Stream Multiplex Layer
- Application Layer
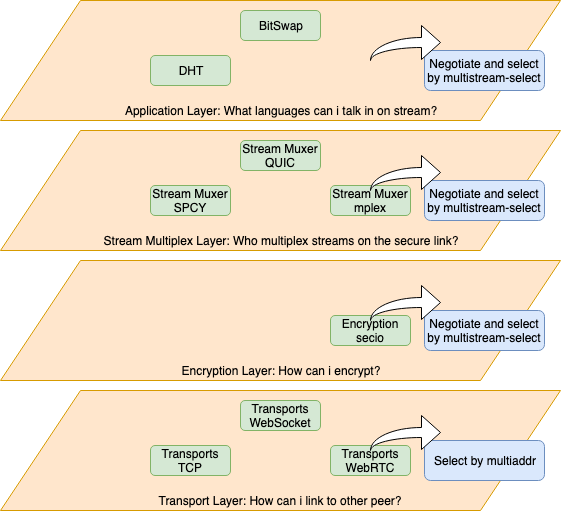
- Transport Layer
- 다른 Peer 와 Connection 구성
- Protocols
- TCP
- UDP, uTP
- WebSocket
- WebRTC
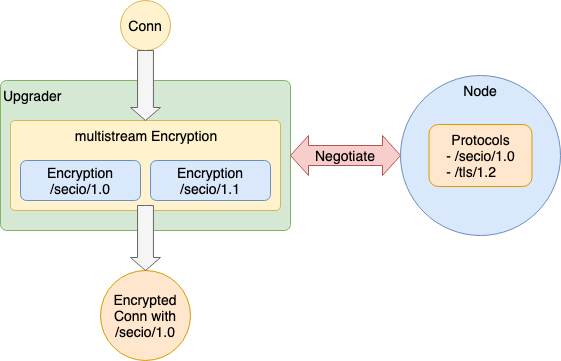
- Encryption Layer
- Connection 상의 데이터그램을 암호화 및 서명 추가
- Protocols
- secio
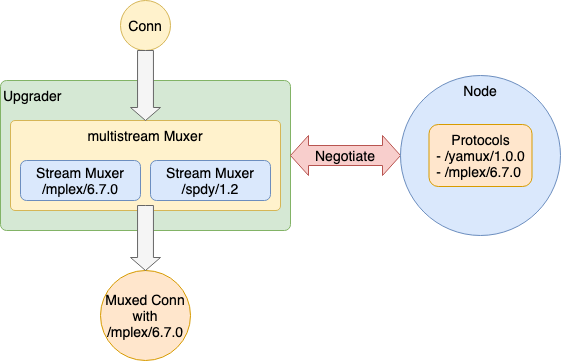
- Stream Multiplex Layer
- Connection 상에 다수의 Stream 을 가상으로 확립
- Protocols
- SPDY, HTTP/2
- yamux
- mplex
- Application Layer
- Application이 이용
- Protocols
- DHT
- BitSwap
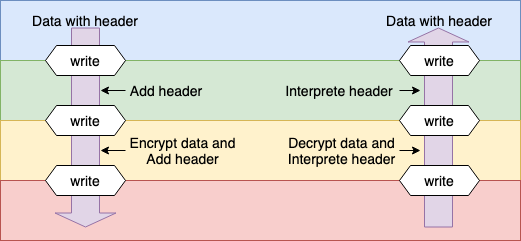
libp2p 에서는 Encapsulation 하여 Layer 를 올리는 것을 Upgrade 라고 한다.
Go 구성
Go의 경우 쌍방향 통신을 실시하는 경로 (Connection, Stream) 는 모두 ReadWrite Closer 에 추상되어 각 Layer 의 랩핑으로 실현한다.
// transport connection
type Conn io.ReadWriteCloser
func (c *Conn) Write(data []byte) error {
  sendMesage(data)
}

// encrypted encapsulation
type encryptedConn {
  conn Conn
}
func (e *encryptedConn) Write(data []byte) error {
  header := createheader(data)
  encrypted := encrypt(data)
  buf := concat(header, encrypted)
  e.conn.Write(buf)
}
func wrapEncryptConn(insecure io.ReadWriteCloser) (*encryptedConn, error) {
  return &encryptedConn{conn: insecure}
}

// stream multiplex encapsulation
type muxedConn {
  conn encryptedConn
}
func (m *muxedConn) Write(data []byte) error {
  header := createheader(data)
  buf := concat(header, data)
  m.conn.Write(buf)
}
func wrapMuxedConn(simple io.ReadWriteCloser) (*muxedConn, error) {
  return &muxedConn{conn: simple}
}

conn, err := transportConn(multiaddr)
econn, err := wrapEncryptConn(conn)
mconn, err := wrapMuxedConn(econn)

mcon.Write(bufferarray)
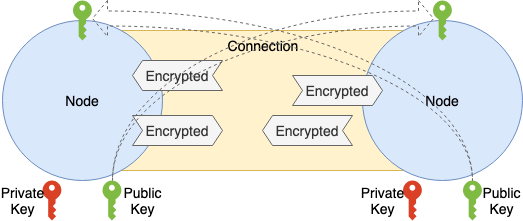
1.3.4 Encryption
통신의 기밀성, 무결성을 담보하기 위해서는 통신 내용의 암호화 및 변조 감지가 필요하다.
Transport Protocol 에 의해 암호화되어있는 것도 있지만 Transport Protocol 에 의존하지 않고 암호화 및 변조 검출을 위해 이 레이어에서 다시 암호화 및 변조 감지 제공을 한다.
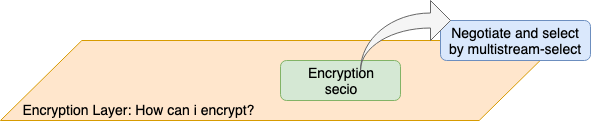
PeerID 생성시에 공개 키를 생성하고 있기 때문에 TLS Like 암호화를 하는 것은 어렵지 않다.
구현
Crypto channels 라이브러리는 아래에 정리되어 있다.
Crypto channels - libp2p.io/implementations
- libp2p-secio
Go 의 경우 관련 interface가 go-conn-security 라는 모듈에 정의되어 있다.
현재 secio 만 구현되어 있어 libp2p 의 디폴트라 할 수 있다.
Go 의 경우 Upgrader 에 의해 Transport 의 Connection 을 Upgrade 하는 형태로 적용된다.
Upgrade 된 Connection 을 사용하여 데이터 송신/수신하는 경우 모든 데이터 그램이 이 Layer 의 Encapsulation/Decapsulation 에 의해 수송된다.
1.3.4.1 secio
데이터의 암호화와 서명을 실시하는 Protocol 로서 TLS 와 유사함을 알 수 있다.
[handshake]
데이터 교환은 모두 Protocol Buffer 에 의해 이루어지는 것으로 가정한다.
- [0] 전제 조건
- Node 마다
PublicKey/Private Key는 이미 생성되어 있다
- Node 마다
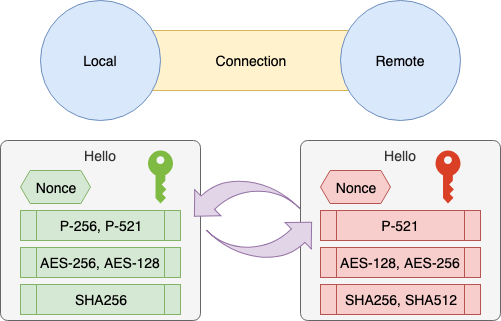
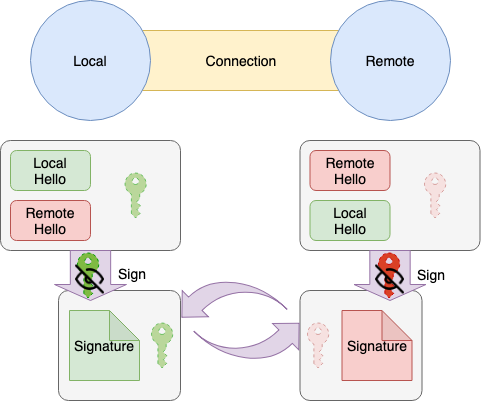
- [1] 기본 정보의 교환 (Hello)
- 1.1. Nonce 를 작성함
- 1.2.
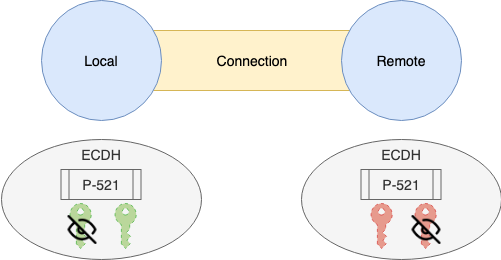
Local Nonce,Local Node PublicKey사용 (가능한 KeyExchange, Cipher, Hash 방식의 후보를 교환)- 후보는 문자열을
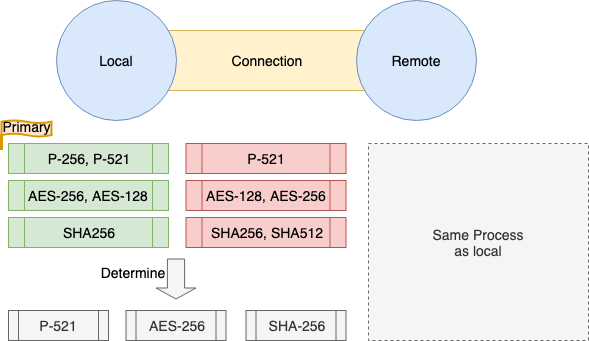
,으로 나눈것으로 우선도가 높은것부터 늘어놓는다. exP-256, P-384, P-521 - 디폴트로 이용 가능한 KeyExchange 방식
- P-256
- P-384
- P-521
- 디폴트로 이용 가능한 Cipher 방식
- AES-256
- AES-128
- Blowfish
- 디폴트로 이용 가능한 Hash (MAC) 방식
- SHA256
- SHA512
- 후보는 문자열을
- [2] Node ID검증
- 1.1 1.2 에서 받은 Remote Node PublicKey가 Node ID와 일치하는지 검증
- [3] 알고리즘 결정
- 3.1. Local Node, Remote Node 사이에서 결정에 차이가 나오지 않도록, 우선 순위를 정한다
- SHA256(PublicKey+Nonce)의 큰 쪽이 우선
- 3.1. Local Node, Remote Node 사이에서 결정에 차이가 나오지 않도록, 우선 순위를 정한다
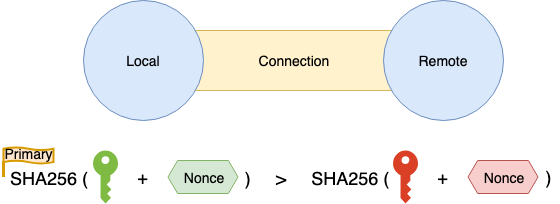
- 3.2. 서로 대응하고 있는 방식을 비교하고 KeyExchange/Cipher/Hash 방식을 결정
- 3.1에서 요구한 우선도가 높은 것이 우선된다
- [4] 키 교환
- 4.1. KeyExchange 용
PublicKey/PrivateKey생성- 3.2에서 정한 KeyExchange 방식
- 4.1. KeyExchange 용
- 4.2. 1.2의
Local Hello,Remote Hello와Local Exchange PublicKey를 결합하고Local Node PrivateKey에 SignSign(LocalHello + RemoteHello + LocalExchangePublicKey)
- 4.3.
Exchange PublicKey과 4.2의Signature를 서로 교환
- 4.4. 4.3에서 받은
Remote Signature은 1.2에서 받은Remote Node PublicKey에서 검증
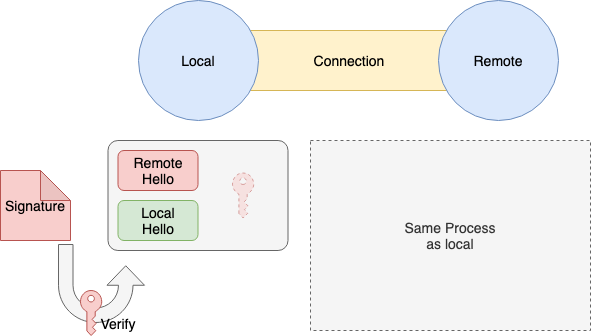
- 4.5. 1.2에서 받은
Remote Exchange PublicKey과Local Exchange PrivateKey에서 공유된Secret를 생성
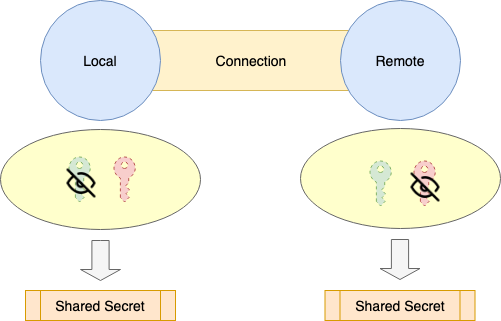
- [5] 암호키 생성
- 5.1.
Secretbytes를 반으로 나눈다.- 각각 Reader 와 Writer 키의 원데이터가 된다
- 3.1에서 요구한 우선 순위에 의한 2개를 교체
- 5.2. 5.1에서 얻은 절반의 bytes를 각각
Cipher IV,Cipher Key,HMAC Key의 3가지 bytes로 나뉜다 - 5.3. 한쪽에서
Cipher IV,Cipher Key,HMAC Key로EtM (Encrypt-then-MAC ) Writer를 구축하고 다른 한쪽에서EtM Reader를 구축한다 - 5.4. 5.3의 Writer, Reader 와 결합하여 암호화된 Connection이 완성
- 5.1.
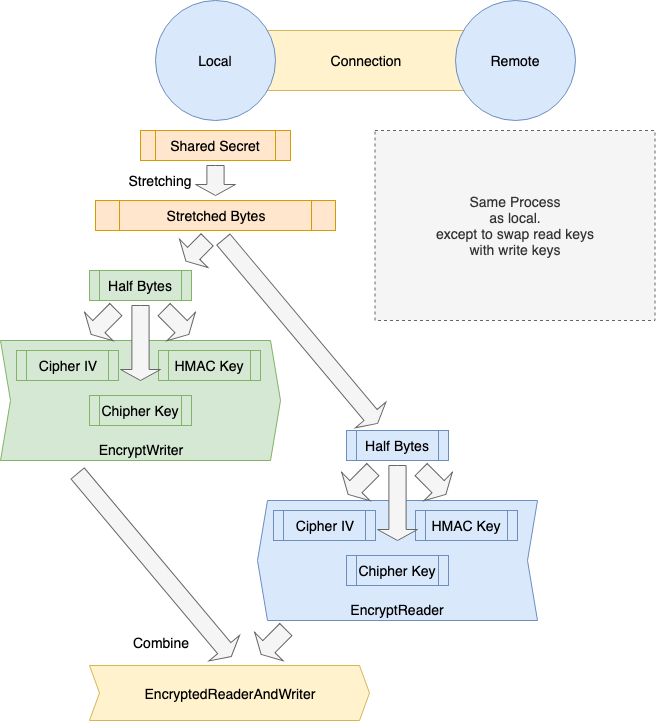
포인트는
- 2의 검증에서 접속하고 싶은 multiaddr 와 PublicKey가 일치함을 알 수 있으므로 제삼자 증명은 불필요
- 즉, 클라이언트가 multiaddr 로 접속처를 지정한다. ‘이 공개키를 가진 사람과 잇고 싶다’ 라는의미
- 4.4 로 서명 능력을 체크
- 이것으로 multiaddr 에서 제시된 공개키/비밀키를 가진 Node 라는 검증이 완료
- 5에서 Read/Write 의 키를 떠난 이유는 불명
- tls 실제로도 이렇게 되어있는지는 미확인
- 5.1에서 2가지 bytes 를 우선 순위로 바꾸는 것은 Local Writer 에 Remote Reader, Local Reader 에 Remote Writer 가 대응하게 하기 위함
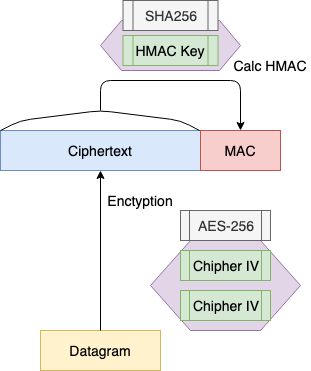
[send, receive]
송신되는 데이터그램은 handshake 에서 생성된 Cipher IV, Cipher Key 로 암호화되어 MAC 을 부여해 송신된다.
수신한 데이터그램은 MAC 을 검증하고 Cipher Key, Cipher Key 로 복호화한다.
1.3.5 Stream Muxer

Transport Protocol 에 의존하지 않고 암호화 된 양방향 통신 가능한 Connection 이 확립되어 있지만 libp2p 는 일반적으로 그들을 직접 사용하는 것이 아니라 Stream 이라는 가상 (논리적) 양방향 통신 채널을 만들고 P2P Protocol 프레임은 Stream 에서 교환한다.
Stream 은 하나의 Connection 에 다중화 (multiplexing) 연결을 만드는 것으로 연결 처리 및 암호화 Protocol Handshake 등의 오버 헤드를 억제한다.
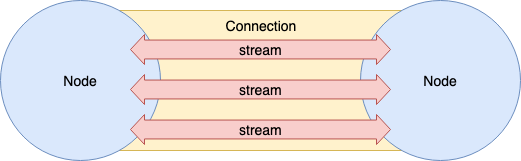
[multiplexing] 이란
어느 하나의 통신 채널을 사용해 복수의 스트림을 송수신 하는 것이다.
예를 들면 SSH 는 하나의 Connection 으로 복수 Session 을 다루는 기능을 가지고 있다. tmux (terminal multiplexer) 는 하나의 Screen에서 복수의 가상 Terminal을 조작한다. 또 sslh 는 443 Port 하나로 HTTP, SSH, OpenVPN 등 복수의 Protocol 을 Listen 및 Handle 할 수 있다.


Connection 상에서 Stream 을 다중화하기 위한 Stream Muxer 인터페이스 사양이 정의되어 있다.
- Connection 에 Attach
- Outgoing
- 새로운 Stream Open
- Incomming
- Stream마다 Listener 등록
구현
각 언어의 구현 된 모듈은 다음과 같다.
Stream muxers - libp2p.io/implementations
- libp2p-spdy
- libp2p-multiplex
- mplex 구현
- libp2p-yamux
Go 의 경우 관련 interface 가 go-stream-muxer 모듈에 정의되어있다. SPDY, yamux 도 Multiplexing 대응 프로토콜 또는 구현을 통해 각 Protocol 구현 패키지 Factory 에 Connection 을 전달하는 방식으로 널리 이용되고 있다.
Encryption 과 마찬가지로 Upgrader 의해 Connection 을 Upgrade 하는 형태로 적용된다. Upgrade 된 Connection 을 사용하여 데이터 송/수신하는 경우, Stream 식별자 포함 Frame Header 에서 Encapsulation/Decapsulation 되어 전송된다.
[js-libp2p-spdy]

const spdy = require('spdy-transport') // Nodejs의 SPDY 구현 모듈
const toStream = require('pull-stream-to-stream')
...

const conn = toStream(rawConn) // Pull Stream 을 보통 Stream 으로 변환

const spdyMuxer = spdy.connection.create(conn, { // Stream 을 받고 SPDY Connection 작성
  protocol: 'spdy',
  isServer: isListener
})
[go-smux-yamux]

import (
...
  yamux "github.com/whyrusleeping/yamux" // Go 의 yamux 구현 모듈
)
...

func (t *Transport) NewConn(nc net.Conn, isServer bool) (smux.Conn, error) {
  var s *yamux.Session
  var err error
  if isServer {
    s, err = yamux.Server(nc, t.Config()) // connection 을 받고 yamux 서버 만들기
  } else {
    s, err = yamux.Client(nc, t.Config()) // connection 을 받고 jamux 클라이언트 만들기
  }
  return (*conn)(s), err
}
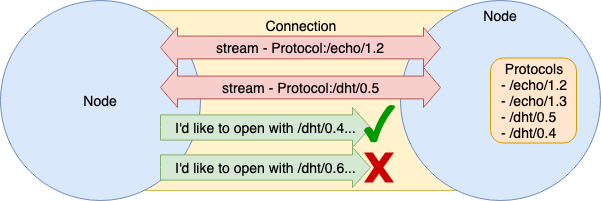
1.3.6 Protocol-Multiplexing
libp2p 는 다양한 플랫폼 상에서 동일하게 동작함을 목적으로 하고 있기 때문에 여러 Protocol 을 대응하고 있다.
각 Peer 가 복수의 Protocol 에 대응하기 위해 사전 합의 없이 어떠한 방법으로 Protocol 을 선택할 수 있는지 알아보자면 다음과 같다.
libp2p 는 multistream + multistream-select 방식을 취한다.
※ 여기서 말하는 Stream 은 양방향 통신 경로 모두를 의미한다. (Go 에서 말하는 io.ReadWriteCloser)
1.3.6.1 multistream (self-describing protocol/encoding stream)
자가 기술형 프로토콜 스트림이라 할 수 있다.
libp2p 에서는 multistream 방식으로 표현한다. multistream 에서는 Protocol 을 Protocol Name + Version 으로 나타낸다.
multistream - properties - libp2p/specs
/<protoName string>/<version string>
※ /ipfs/<_node id_="">/<_protoName string_="">/<_version string_=""> 과 같은 형식으로 설명되는 부분이 많이 보여 지지만, multistream 사양 자체는 Node의 주소와 연결되는 것이 아니며 구현에도 /ipfs/<_node id_=""> 는 붙어 있지 않다.
multistream 자체는 이를 규정하고 있을 뿐이며 어떤 순서로 Handshake 하고, Buffer 를 보내고, 합의에 이르는지 순서는 multistream-select 가 담당하고 있다.
1.3.6.2 multistream-select
multistream 형식의 데이터 형식과 합의 과정을 규정하고있는 것이 multistream-select 이다.
multiformats/multistream-select
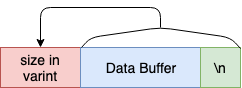
length-prefixed-message
그 전에 length-prefixed-message 에 대해 알아보자.
- multistream-select 의 모든 Message Buffer 는 length-prefixed-message 라 불리는 형식으로 보내진다
- 송신하는 Buffer 의 선두에 Buffer 사이즈를 Uvarint 로 부여한다
- multistream-select 의 모든 Message Buffer 는 마지막에
\n을 부여한다length-prefixed-message사이즈는 이것을 포함한 사이즈가 된다
handshake
우선 multistream 버전을 확인 준다. Dial 측에서 자신의 Protocol, Version 을 보내고 상대방 Protocol, Version 을 반환한다. 그 과정에서 Dial 측, Listen 측 어느쪽이든 검증한다. (실제 Listen 측 검증만으로 끝남)
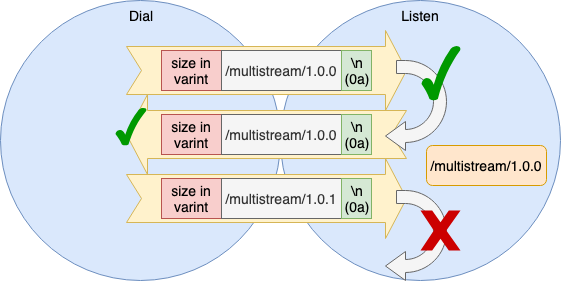
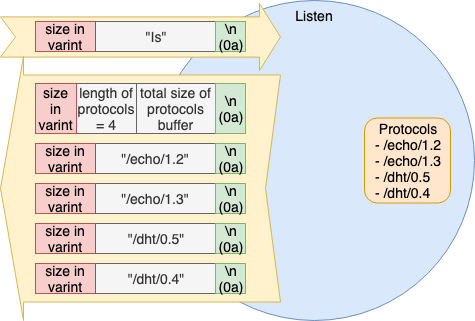
ls
Listener 측은 자신이 지원하는 Protocol 이름 목록을 반환한다. 지원하는 Protocol 은 Peer 생성시에 사전에 등록한다.
select
Dialer 측은 자신이 접속하고자 하는 Protocol 이름을 보내고 Listener 측이 OK 이면 Protocol 이름을 Ack 로 돌려 준다.

Version 선택은 현재 Node 에만 구현되었지만 SemVer 를 사용한 Version 범위 지정도 가능하다. Semantic Versioning 2.0.0
구현
- Node
- Go
- multiformats/go-multistream
- 저장소 이름에
-select가 없다는 것이 혼란하다는 지적도 있다
1.3.7 Swarm
Transport, Connection, Stream 을 내포하고 Dial, Listen 처리 전체 조정을 맡고있는 것이 Swarm 이다. 너무 정보가 없는 Role 이지만 매우 중요한 역할을 담당하고 있다.
Go는 go-libp2p-swarm 이라고 하는 자체 구현이 존재한다. Node.js 는 비슷한 js-libp2p-switch 가 있다.
1.3.7.1 요약
Swarm Overview 는 다음 그림과 같다.
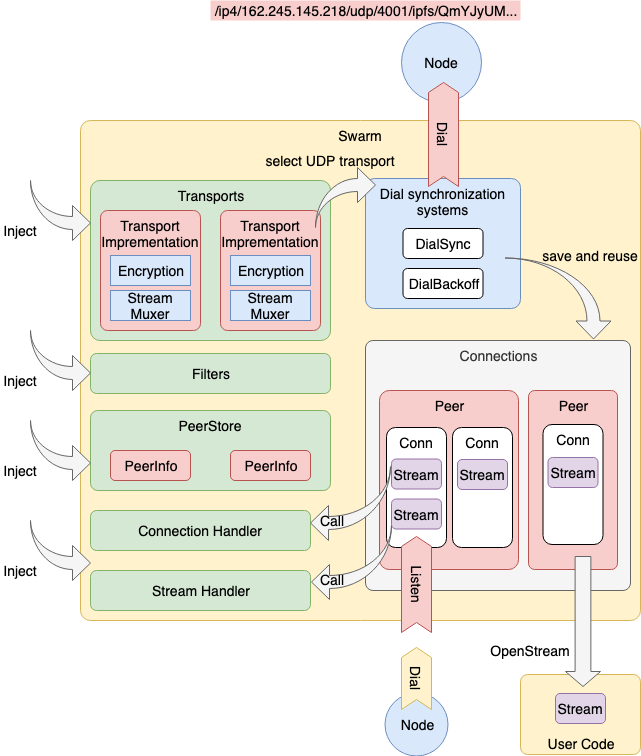
- 복수의 Transport 관리
- Connection 은 Peer 마다 여러개 유지
- Filter 의 접속 제한
- PeerStore 에서 PeerInfo 관리
- Connection, Stream 의 Listener 에 Handler 를 Attach 할 수 있다
- Dial Synchronization System 이 되는 기능을 갖는다
1.3.7.2 Multi-Transport
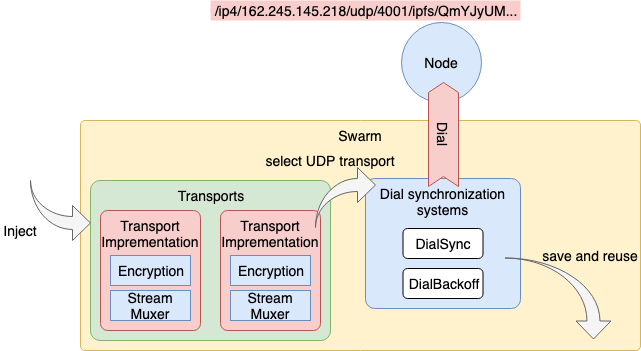
Swarm 은 복수의 Transport 를 관리할 수 있다.
이로 인하여 다른 Peer 와 접속할 때는 상대가 이용 가능한 Transport Protocol 을 선택해 접속해 준다.
예를 들어 /ip4/162.246.145.218/udp/4001/utp/ipfs/QmYJyUM… 라는 multiaddr 에서 Listen 하고있는 Peer 에 연결하는 경우에는 uTP Protocol 을 구현 한 Transport 가 필요하다. 필요한 Transport 가 없는 경우 에러를 발생한다.
1.3.7.3 Multi-Connection
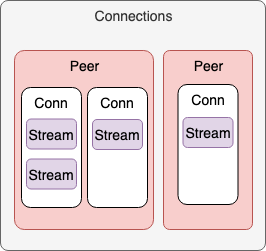
Swarm 내의 데이터 구조는 Connection 은 여러개 가질 수 있게 되어있다. 그러나 구현을 확인하면 복수로 이중화 한다는 의미가 보이지 않는다.
Swarm 은 Connection 을 은닉하고 있어 직접적인 조작은 공개하지 않고 접속 처리는 Stream 을 만들 때의 아래 체크 부분에서 필요하게 되어 이루어진다.
[libp2p/go-libp2p-swarm/swarm.go]

func (s *Swarm) NewStream(ctx context.Context, p peer.ID) (inet.Stream, error) {
  log.Debugf("[%s] opening stream to peer [%s]", s.local, p)

  // Algorithm:
  // 1. Find the best connection, otherwise, dial.
  // 2. Try opening a stream.
  // 3. If the underlying connection is, in fact, closed, close the outer
  //    connection and try again. We do this in case we have a closed
  //    connection but don't notice it until we actually try to open a
  //    stream.
  //
  // Note: We only dial once.
  //
  // TODO: Try all connections even if we get an error opening a stream on
  // a non-closed connection.
  dials := 0
  for {
    c := s.bestConnToPeer(p) // 살아있는 Connection을 찾는다
    if c == nil {
      if dials >= DialAttempts { // const DialAttempts = 1 이므로 시도 1 번
        return nil, errors.New("max dial attempts exceeded")
      }
      dials++

      var err error
      c, err = s.dialPeer(ctx, p) // 여기에서 Dial
      if err != nil {
        return nil, err
      }
    }
    s, err := c.NewStream() // Connection 이 발견되면 Stream 만들기
    if err != nil {
      if c.conn.IsClosed() {
        continue
      }
      return nil, err
    }
    return s, nil
  }
}
...

func (s *Swarm) bestConnToPeer(p peer.ID) *Conn {
  // Selects the best connection we have to the peer.
  // TODO: Prefer some transports over others. Currently, we just select
  // the newest non-closed connection with the most streams.
  s.conns.RLock()
  defer s.conns.RUnlock()

  var best *Conn
  bestLen := 0
  for _, c := range s.conns.m[p] {
    if c.conn.IsClosed() {
      // We *will* garbage collect this soon anyways.
      continue // 닫고있는 녀석은 가비지컬랙션 되므로 방치
    }
    c.streams.Lock()
    cLen := len(c.streams.m)
    c.streams.Unlock()

    if cLen >= bestLen { // Stream 이 많다 = 살아있는 가능성 높다 는 판단
      best = c
      bestLen = cLen
    }
  }
  return best
}
이러한 내용을 보면 살아있는 Connection 하나를 최대한 재사용 하고자 하는 의도처럼 보인다.
1.3.7.4 Dial Synchronization System
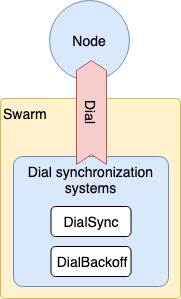
Swarm 은 Outbound 트래픽이 초과되지 않도록 Dial 에 대한 연구가 이루어지고 있다.
[DialSync]
Peer 에 대한 Dial 요구가 동시에 여러 온 경우 이전 Dial 처리가 끝날 때까지 기다린다. (단위는 Peer 마다)
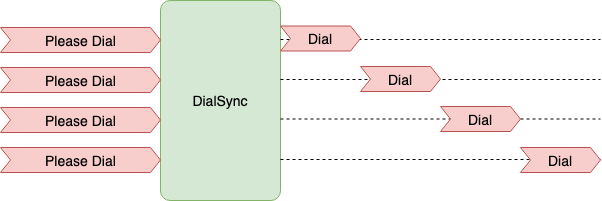
구현은 여기 를 확인한다.
[Backoff]
이미 연결할 수 없게 된 Peer 대해 계속 접속 요청을 해도 소용없기 때문에 일단 연결에 실패하면 Backoff 목록에 추가되어 다음 식에 나타난 시간이 경과하지 않으면 재시도 할 수 없게된다.
// BackoffBase + BakoffCoef * PriorBackoffs^2
until := (5 + 1 * (retryCount + retryCount)) * time.Second
연결에 성공하면 Backoff 목록에서 제외된다.
구현은 여기 를 확인한다.
1.3.7.5 Multi-Encryption Protocol handled with multistream
Swarm 역할로서 Encryption Protocol 의 Instance 는 외부에서 Injection 되므로 범위 밖이지만 libp2p 의 이념에서 Encryption 은 Peer 끼리 사용할 수 있는 것을 선택할 수 있어야 한다. (multistream을 이용하는 것이 전제된 것으로 예상)
실제로, go-libp2p 는 Encryption에 go-conn-security-multistream 을 이용하고있다.
go-conn-security-multistream 은,
- Encryption Protocol 을 미리 복수 등록
- 이것이 multistream의 대응 Protocol
- Upgrader 에 의해 Connection 이 Upgrade 될 때, multistream-select 에 따라 Encryption Protocol Negotiation
- Negotiation 이 잘 되면 그 Encryption Protocol 에서 Connection 을 랩
1.3.7.6 Multi-StreamMuxer Protocol handled with multistream
Encryption 과 마찬가지로 Stream Muxer 의 Instance 도 외부 Injection 되므로 범위 밖이지만 libp2p 의 이념에서 Stream Muxer Protocol 도 선택할 수 있어야 한다. (multistream을 이용하는 것이 전제된 것으로 예상)
go-libp2p 는 Stream Muxer 로 go-smux-multistream 을 이용하고 있으며 Node.js 는 js-libp2p-switch 에서 Muxer 에 이용되고 있다.
go-smux-multistream 은
- Stream Muxer Protocol 을 미리 복수 등록
- 이것이 대응 Protocol
- Upgrader 에 의해 Connection 이 Upgrade 될 때, multistream-select 에 따라 Stream Muxer Protocol 의 Negotiation
- Negotiation 이 잘 되면 그 Stream Muxer Protocol 에서 Connection 을 랩
1.3.7.7 Multi-Stream Protocol handled with multistream
Swarm 범위 밖이지만 이것도 libp2p 의 이념에서 multistream 을 이용하는 것을 예상할 수 있다.
실제로 go-libp2p/p2p/host/basic/basic_host.go 에서 다음과 같이 사용하고 있다.
[Dial 측]

func (h *BasicHost) NewStream(ctx context.Context, p peer.ID, pids ...protocol.ID) (inet.Stream, error) {
  ...

  var protoStrs []string
  for _, pid := range pids {
    protoStrs = append(protoStrs, string(pid)) // 연결하고 싶은 Protocol 을 목록으로
  }

  s, err := h.Network().NewStream(ctx, p) // 새로운 Stream 생성
  if err != nil {
    return nil, err
  }

  selected, err := msmux.SelectOneOf(protoStrs, s) // 그 Stream 에 multistream negotiation
  if err != nil {
    s.Reset()
    return nil, err
  }
  selpid := protocol.ID(selected)
  s.SetProtocol(selpid)
  h.Peerstore().AddProtocols(p, selected) // 한 번 연결된 Protocol 은 저장

  return s, nil
}
[Listen 측]

// Host 인스턴스 생성시
func NewHost(ctx context.Context, net inet.Network, opts *HostOpts) (*BasicHost, error) {
  h := &BasicHost{
    network:      net, // Swarm 인스턴스
    mux:          msmux.NewMultistreamMuxer(), // go-multistream 인스턴스
    negtimeout:   DefaultNegotiationTimeout,
    AddrsFactory: DefaultAddrsFactory,
    maResolver:   madns.DefaultResolver,
  }
  ...

  net.SetStreamHandler(h.newStreamHandler) // Swarm 에서 Stream 확립했을 때 불리는 handler 등록
  return h, nil
}

// 호출 handler
func (h *BasicHost) newStreamHandler(s inet.Stream) {
  ...

  lzc, protoID, handle, err := h.Mux().NegotiateLazy(s) // 요청을 받고 Negotiation
  took := time.Now().Sub(before)
  ...

  s.SetProtocol(protocol.ID(protoID))
  log.Debugf("protocol negotiation took %s", took)

  go handle(protoID, s) // 사용자가 등록한 handler 호출
}

// 사용자가 handler 등록
func (h *BasicHost) SetStreamHandler(pid protocol.ID, handler inet.StreamHandler) {
  h.Mux().AddHandler(string(pid), func(p string, rwc io.ReadWriteCloser) error {
    is := rwc.(inet.Stream)
    is.SetProtocol(protocol.ID(p))
    handler(is)
    return nil
  })
}
[사용하는 경우]

// Register protocol
host.SetStreamHandler("/echo/1.2", handleStream)

// OpenStream for protocol
s, err := host.NewStream(context.Background(), info.ID, "/echo/1.2")
1.3.7.8 Swarm 정리
- Transport Layer
- Protocol 선택은 Swarm 이 Connection 이 설정 될 때 multiaddr 을 보면서 판단
- Encryption Layer
- Protocol 선택은 이용 측에 의존
- 직접 사용하는 경우는 선택할 필요 없음
conn-security-multistream을 사용한 경우 Transport Connection 설치시 multistream Negotiation 에서 선택
- Protocol 선택은 이용 측에 의존
- Stream Multiplex Layer
- Protocol 선택은 이용 측에 의존
- 직접 사용하는 경우는 선택할 필요 없음
smux-multistream의 경우 Transport Connection 설치시 multistream Negotiation 에서 선택
- Protocol 선택은 이용 측에 의존
- Application Layer
- Protocol 선택은 이용 측에 의존
multistream를 이용한 경우 Stream 생성시 multistream Negotiation 에서 선택
- Protocol 선택은 이용 측에 의존
각층마다 Protocol 을 Multiple 로 하고 Peer 끼리 합의를 하면서 Protocol 을 결정하는 방향성을 가지고 있는것을 알 수 있다.
1.3.8 Host ( Node )
Swarm 을 내포하고 Network 이외의 Modules 도 통합해 관리하는 역할로 말하자면 Node(Peer) 자체를 나타내는 모델이다. 특별한 사양이 정해져 있는 것은 아니다.
구현
- Node
- Go
Go 의 경우 go-libp2p-host 에 Interface 가 정의되어 있다.
